今回の改装はイラストとマンガのギャラリーページ作成に力を入れたのでメモ。曲者 WP_Query() 関数の、自分なりの使い方など。
編集したのは投稿一覧ページと個別投稿ページ。それぞれの内容をまとめる。
投稿一覧ページ(content.php) の変更点
各投稿を下のような感じで分類していって、それぞれ見せたいデザインで見せるようにした。きれいに書いたフローチャートを用意するのが面倒で見にくいけど。
if文とin_category()関数で1つ目の分岐をさせ、自作の「in_gallery()」系関数でさらにギャラリー内の投稿を3つに分岐させた。
分岐1:「投稿一覧」の分岐
ギャラリー系:マンガ or イラスト → 更に分岐
それ以外:お知らせ or 備忘録 → 今までどおり
分岐2:「ギャラリー」内の分岐
ギャラリーA:「イラスト」今年のページ
ギャラリーB:「本編」最新話 or 「短編と4コマ」
ギャラリーC:それ以外(過去作)
各ギャラリーの見せ方
ギャラリーA:アイキャッチ画像にブラー(ぼかし)とトリミングをしない
ギャラリーB:アイキャッチ画像を大きく表示、ブラーをかける
ギャラリーC:アイキャッチ画像をトリミング、さらにブラーもかける
ギャラリー内の投稿を判別する自作関数については後述。
「お知らせ」「備忘録」は特に手を加えていないが、ギャラリー系の投稿一覧では、リンクにしたアイキャッチ画像の上に投稿タイトル+投稿日を重ねて表示したので、CSSも地味に大変だった。

アイキャッチ画像をクリックすると個別の投稿ページに移動、画像自体が大きなボタンになっている。大変だった。
CSSはこんな感じ。
/* 文字色を白に */
.white-title {font-size: 2rem; color: #fff;}
    @media screen and (max-width:576px){
        .white-title {font-size: 1.2rem; top: 35%;}
    }

h2.white-title a{color: #fff;}
h2.white-title a:hover{color: #ccc;}

.white-meta {color: #fff;}
div.white-meta a{color: #fff;}


/* ギャラリーA */
.gallery-A { position: relative; }
.gallery-A h2 {    /*タイトルのCSS*/
    position: absolute;
    top: 50%;
    left: 2rem;
    font-size: 2rem;
    transform: translate(0%, -50%);
    margin: 0;
    padding: 0;
}
    @media screen and (max-width:576px){
        .gallery-A h2{font-size: 1.2rem; top: 35%;}
    }
.gallery-A div {    /*投稿日のCSS*/
    position: absolute;
    top: 65%;
    left: 2rem;
    transform: translate(0%, -50%);
    margin: 0;
    padding: 0;
}
    @media screen and (max-width:576px){
        .gallery-A div{top: 55%;}
    }
/* ギャラリーB */
.gallery-B {
    position: relative;
}
.gallery-B h2 {    /*タイトルのCSS*/
    position: absolute;
    top: 50%;
    left: 2rem;
    font-size: 2rem;
    transform: translate(0%, -50%);
    margin: 0;
    padding: 0;
}
    @media screen and (max-width:576px){
        .gallery-B h2{font-size: 1.2rem; top: 35%;}
    }
.gallery-B div {    /*投稿日のCSS*/
    position: absolute;
    top: 65%;
    left: 2rem;
    transform: translate(0%, -50%);
    margin: 0;
    padding: 0;
}

/* ギャラリーC */
.gallery-C { position: relative; }
.gallery-C h2 {    /*タイトルのCSS*/
    position: absolute;
    top: 50%;
    left: 2rem;
    font-size: 2rem;
    transform: translate(0%, -50%);
    margin: 0;
    padding: 0;
}
    @media screen and (max-width:576px){
        .gallery-C h2{font-size: 1.2rem; top: 45%;}
    }

/* ホバー効果 */
.fromBlur {
    filter: brightness(80%) blur(1px);
  transition: 0.4s;
}
.fromBlur:hover {
  filter: none;
}

/* ギャラリーC用トリミング */
img.trim-cover{
    width: 800px;
    height: 150px;
    object-fit: cover;
}
余白等の調整がまだ甘いけど…そこは追々。
投稿ページ(content-single.php)の変更点
ここも「ギャラリー」と「それ以外」に分岐。
ギャラリー系のページは、BootstrapのJumbotronを使ってアイキャッチ画像を投稿タイトルと投稿日の背景にした。

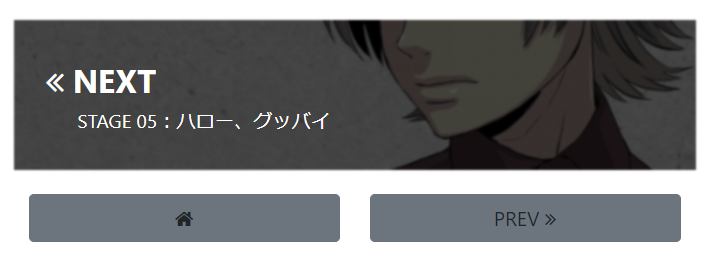
また、「次の話」のアイキャッチ画像を使ったページネーションを作った。
ページネーションのコードはこんな感じ。(PHPとCSS)
<?php if(in_gallery()): ?><!-- 「ギャラリー」かどうか -->

    <!-- ここからカテゴリー内 ページネーション -->
    <?php $next_post = get_adjacent_post( true, '', false, 'category' ); ?>
    <?php if ( !empty( $next_post ) ): ?>
    <a href="<?php echo $next_post->guid; ?>">

    <!-- ここからカバー -->
        <div class="gallery-P">

        <?php
        $nextpost = get_adjacent_post(true, '', false);
        $class = array('class' => "fromBlur toClor trim-cover");
        echo get_the_post_thumbnail( $nextpost->ID, 'large', $class );
        ?>

        <h2 class="white-title text-center">
        <i class="fa fa-angle-double-left"></i> NEXT</h2>
        <div class="white-meta">
        <?php echo get_the_title( $next_post ); ?></div>

        </div>
    <!-- ここまでカバー -->

   </a>
   <?php endif; ?>


    <div class="container">
    <div class="row mt-2"><!-- .row2 -->
    <div class="col">

    <a href="<?php echo esc_url( home_url( '/' ) ); ?>">
    <div class="text-center">
    <button type="button" class="btn btn-lg btn-block btn-secondary">
    <i class="fa fa-home"></i></button>
    </div>
    </a>

    </div><!-- .col -->


    <div class="col">

    <?php previous_post_link('%link', '
        <div class="text-center">
        <button type="button" class="btn btn-lg btn-block btn-secondary">
        PREV <i class="fa fa-angle-double-right"></i></button>
        </div>
    ', TRUE); ?>

    </div><!-- .col -->
    </div><!-- .row2 -->
    </div><!-- .container -->
    <!-- ここまでカテゴリー内 ページネーション -->
/* ギャラリー ページネーション */
.gallery-P { position: relative; }
.gallery-P h2 { /*タイトルのCSS*/
position: absolute;
top: 60px;
left: 2rem;
font-size: 2rem;
transform: translate(0%, -50%);
margin: 0;
padding: 0;
}
@media screen and (max-width:576px){
.gallery-P h2{font-size: 1.2rem; top: 35%;}
}
.gallery-P div { /*投稿日のCSS*/
position: absolute;
top: 100px;
left: 4rem;
font-size: 1.2rem;
transform: translate(0%, -50%);
margin: 0;
padding: 0;
}get_adjacent_post() 関数でカテゴリー内次の投稿の情報を取得、投稿があればアイキャッチ画像にトリミングと効果、文字を付けて次のページボタンに。
Bootstrapのコンテナ、ボタン等を使って 前の投稿 / ホームボタンを設置。
ボタンの配置はpixivのパクリです。
次はギャラリーを判別する自作関数。
WP_Query()関数
この関数の使い方自体は良い解説記事があるのでそちらを参照するとして…
参考:
いっつも忘れるWP_Queryの使用方法とパラメータ一覧。がっつり整理してみた
WordPress 最近の投稿5件を取得して1件目だけ表示を変える
具体的に自分がどう使ったかを載せておく。
作った関数の例
まずは現在の投稿が「ギャラリー」かどうかを判別する関数。
ギャラリーに割り当てたいカテゴリーを配列 $gallery にリストアップし、現在の投稿のカテゴリーがリストに含まれているなら true を返す。
function in_gallery(){
    $gallery = array(  //ギャラリーに割り当てるカテゴリのリスト

        'artworks',
        'comic',
        'invaders',
        'nobodies',
        'archives',

    );

    if (in_category($gallery)){
        return true;
    }
}
次にギャラリー内の投稿を振り分ける。
今年の「イラスト」ページを「ギャラリーA」に割り当てたいので、WP_Query() 関数を使って検索。
詳細は先述の参考ページを参照。
function in_gallry_A(){

    $args_A = array(

        'post_type' => 'post',  //投稿フォーマット「投稿」
        'category_name' => 'artworks', //カテゴリ「イラスト」
        'posts_per_page' => 1,  //取得したい件数
        'orderby' => 'date',  //日付順で
        'order' => 'DESC',  //降順

    );

    $the_query = new WP_Query( $args_A );
    if ( $the_query->have_posts() ){
    while ( $the_query->have_posts() ){
        $the_query->the_post();

        $new_work = get_the_id();  //(★)

        }
    wp_reset_postdata();
    }

    if(get_the_id() == $new_work){
        return true;
    }
}
(★):今回取得件数が1件だけなので $new_work はただの変数にした。取得件数を増やしたいなら配列にする。
同様にギャラリーB、「短編と4コマ」+「本編」最新話。
function in_gallery_B(){

    $category_B = 'nobodies';  //短編は全部ギャラリーBに

    $args_B = array(

        'post_type' => 'post',
        'category_name' => 'invaders',  //カテゴリ:「本編」
        'posts_per_page' => 1,
        'orderby' => 'date',
        'order' => 'DESC',

    );

    $the_query = new WP_Query( $args_B );
    if ( $the_query->have_posts() ){
    while ( $the_query->have_posts() ){
        $the_query->the_post();

        $new_work_B = get_the_id();

        }
    wp_reset_postdata();
    }

    if(get_the_id() == $new_work_B){
        return true;
    }

    elseif(in_category( $category_B )){

        return true;

    }

}
以上、ギャラリーを分別する自作関数。
立派なギャラリーが完成したことだし、それに見合う作品をもっとたくさん描かなきゃね~。