前回書いた長い格闘を経て、漸く着手することができるようになった。以下は実際に変えたことまとめ。
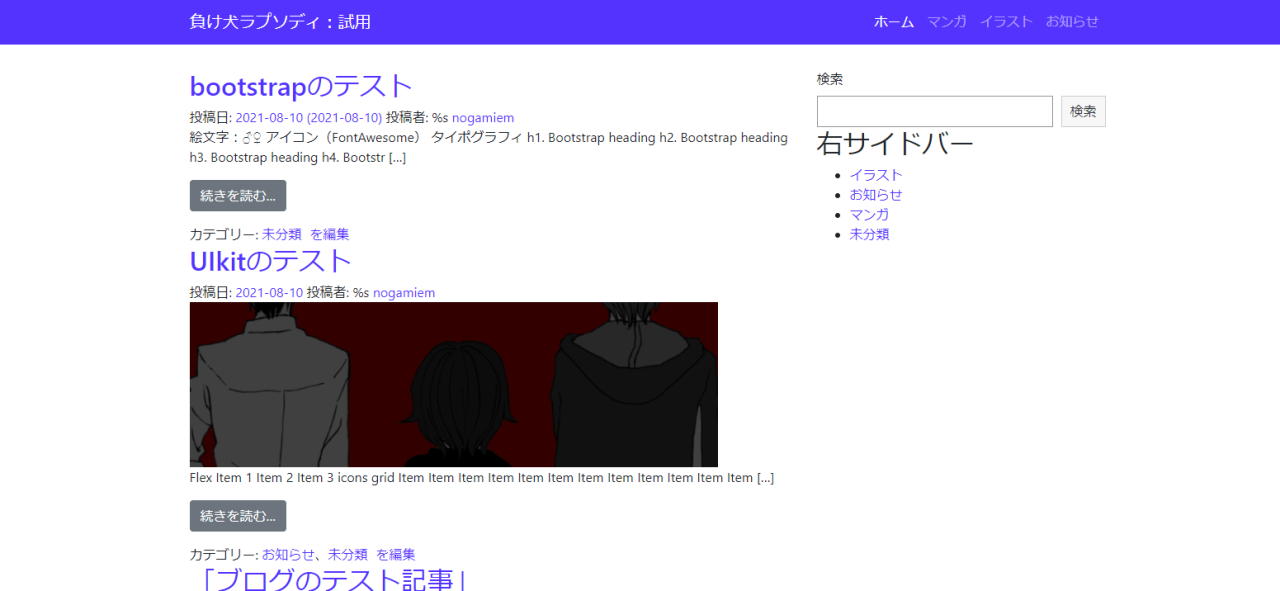
Understrupのデフォルトデザインはこんな感じ。

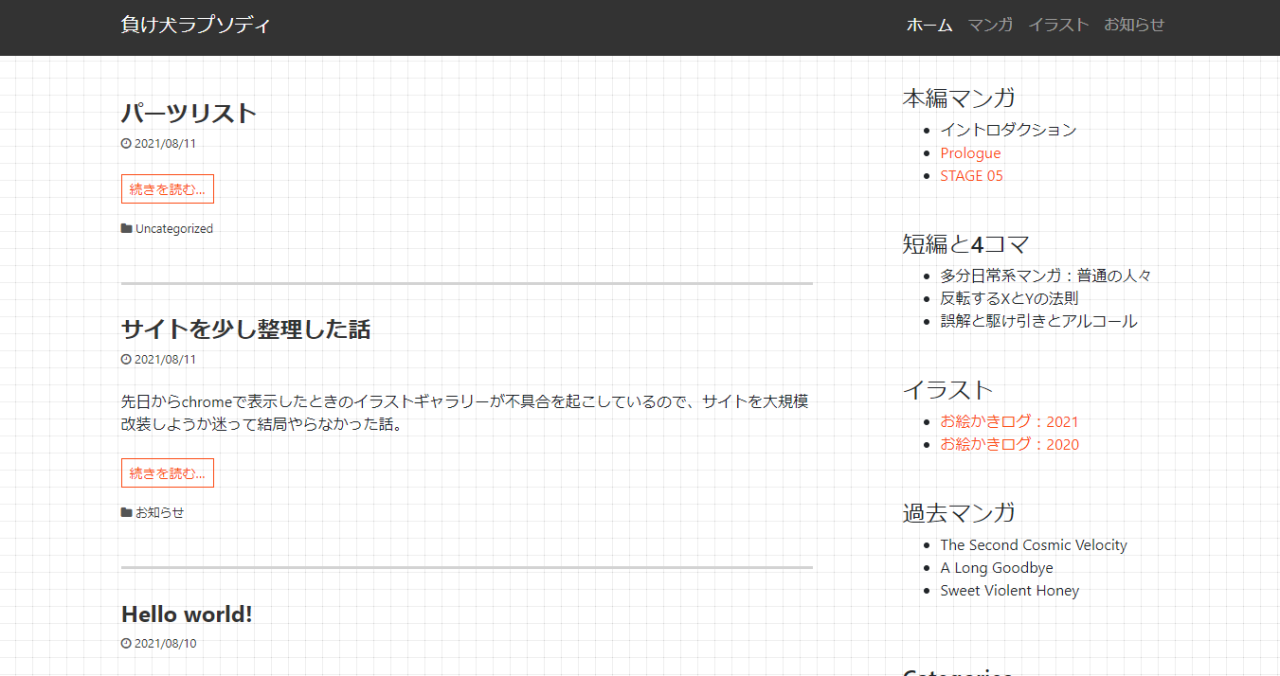
これの子テーマを改造して今までのサイトっぽくデザインするのが目標。
UnderstrapのライセンスはGPLなので、改変&自作発言&再配布が可能らしい。というわけでテーマフォルダ内screenshot.pngをお気に入りのイラストに置き換えて、クレジットも自分用に変更。えへへ。

UnderStrapのファイル構成
こちらの記事が大変便利だったので引用。
yanagi’s memo
understrapことはじめ③ – phpやウィジェットでカスタマイズ > テンプレートphpファイルを編集する
基本色の変更
style.cssにてUnderStrupの基本色を書き換え。手作業で紫基調をオレンジ基調に。
一応後からこういうツールも見つけたがこれだけでは足りなかったので、先に手作業で改変して良かったと思う。
CSSファイルとJsファイルの読み込み
ギャラリーで使用する「Macy」「Luminous」、それと各種CSSファイルを読み込む関数を「function.php」に追記。
//style.css等各種cssとjsファイルを読み込む
if (!is_admin()) {
    $the_theme = wp_get_theme();
     wp_enqueue_style( 'child-understrap-styles',
     get_stylesheet_directory_uri() . '/css/child-theme.min.css',
     array(), $the_theme->get( 'Version' ) );

     wp_enqueue_style( 'nobody-understrap-custom-styles',
     get_stylesheet_directory_uri() . '/style.css', array(),
     $the_theme->get( 'Version' ) );

     wp_enqueue_style( 'nobody-understrap-custom-gallery',
     get_stylesheet_directory_uri() . '/css/gallery_for_wp.css',
     [], $the_theme->get( 'Version' ) );


     wp_enqueue_script( 'nobody-understrap-macy',
     get_stylesheet_directory_uri() . '/js/macy.js',
     array(), $the_theme->get( 'Version' ), true );

     wp_enqueue_script( 'nobody-understrap-macy-opt',
     get_stylesheet_directory_uri() . '/js/macy-opt.js',
     array(), $the_theme->get( 'Version' ), true );

     wp_enqueue_script( 'nobody-understrap-luminous',
     get_stylesheet_directory_uri() . '/js/Luminous.js',
     array(), $the_theme->get( 'Version' ), true );

     wp_enqueue_script( 'nobody-understrap-luminous-opt',
     get_stylesheet_directory_uri() . '/js/Luminous-opt.js',
     array(), $the_theme->get( 'Version' ), true );
}
途中、何故かstyle.cssが読み込まれていないし読み込んだとしてもあとからデフォルトのCSSで上書きされるとかいうク●トラブルがあったけど何とか対応。
以下、小テーマのフォルダにないものは親テーマからコピーして改変(ちゃんとフォルダの構成も親テーマと合わせること!)。
フッターのクレジットを変更
「footer.php」の30行目くらいにある部分を書き換え。
<div class="site-info">

       © <?php echo date('Y'); ?> <a href="'.home_url().'">
                                   <?php bloginfo( 'name' ); ?></a>

 </div><!-- .site-info -->
記事一覧の著者名を非表示にして著者アーカイブをリダイレクト
「https://(サイトURL)/?author/」で著者ページにアクセスできるままだとセキュリティ的によろしくないので、ここにアクセスしようとするとトップページへ飛ばされるように変更。
参考:WordPressで特定のページを404扱いやリダイレクト処理で無効にする方法
//著者名を非表示にして著者アーカイブをトップページにリダイレクト
add_filter('understrap_posted_by', 'myPostedBy');
function myPostedBy() {
    return '';
}
add_action( 'template_redirect', 'my_author_redirect', 1);
function my_author_redirect() {
    if ( is_author() ){
        wp_safe_redirect( home_url() );
        exit;
    }
}
コメント欄を閉じる
「comments.php」の中身をすべて消去。一応、ダッシュボードの設定でコメントを受け付けないようにしておく。
メタ情報「投稿日」まわりを変更
デフォルトでは更新日が括弧書きで出力されてしまうので削除。親テーマの「/inc/tamplate-tags.php」をコピーして書き換えても良いと思うが、「function.php」にコピペして編集する方法が紹介されていたのでこちらでやってみた。
参考:How to remove “date updated” on posts
さらに、デザインをもっとオシャレにしたかったので、文字部分をそれぞれFontAwesomeの「クロック」「フォルダ」「タグ」アイコンへ変更。日本語だとバグで文字化けするし……
//投稿日のカスタム:更新日削除とアイコン使用
function understrap_posted_on() {
$time_string =
'<time class="entry-date published updated"
                datetime="%1$s">%2$s</time>';
if ( get_the_time( 'U' ) !== get_the_modified_time( 'U' ) ) {
$time_string =
'<time class="entry-date published" datetime="%1$s">%2$s</time>
<time class="updated" datetime="%3$s"></time>';
}
$time_string = sprintf(
$time_string,
esc_attr( get_the_date( 'c' ) ),
esc_html( get_the_date() ),
esc_attr( get_the_modified_date( 'c' ) ),
esc_html( get_the_modified_date() )
);
$posted_on = apply_filters(
'understrap_posted_on',
sprintf(
'<span class="posted-on"><i class="fa fa-clock-o"></i>
    %1$s <a href="%2$s" rel="bookmark">%3$s</a></span>',
esc_html_x( '', 'post date', 'understrap' ),
esc_url( get_permalink() ),
apply_filters( 'understrap_posted_on_time', $time_string )
)
);
$byline = apply_filters(
'understrap_posted_by',
sprintf(
'<span class="byline"> %1$s<span class="author vcard">
        <a class="url fn n" href="%2$s">%3$s</a>
    </span></span>',
$posted_on ? esc_html_x
( 'by', 'post author', 'understrap' ) :
esc_html_x
( 'Posted by', 'post author', 'understrap' ),
esc_url( get_author_posts_url
( get_the_author_meta( 'ID' ) ) ),
esc_html( get_the_author() )
)
);
echo $posted_on . $byline;
// phpcs:ignore WordPress.Security.
EscapeOutput.OutputNotEscaped
}
エントリーフッター「カテゴリー」等をアイコンに変更
ここはちょっとうろ覚え。この部分のバグり様とダサさを改善した。

上の投稿日まわりと同様親テーマから「template-tags.php」の一部をコピペ編集する方法をとった。
元の内容:
if ( ! function_exists( 'understrap_entry_footer' ) ) {
/**
* Prints HTML with meta information for the categories,
tags and comments.
*/
function understrap_entry_footer() {
// Hide category and tag text for pages.
if ( 'post' === get_post_type() ) {
/* translators: used between list items,
there is a space after the comma */
$categories_list =
get_the_category_list( esc_html__( ', ', 'understrap' ) );
if ( $categories_list && understrap_categorized_blog() ) {
/* translators: %s: Categories of current post */
printf( '<span class="cat-links">'
    . esc_html__( 'Posted in %s', 'understrap' ) . '</span>',
$categories_list );
// phpcs:ignore WordPress.Security.
EscapeOutput.OutputNotEscaped
}
/* translators: used between list items,
there is a space after the comma */
$tags_list =
get_the_tag_list( '', esc_html__( ', ', 'understrap' ) );
if ( $tags_list ) {
/* translators: %s: Tags of current post */
printf( '<span class="tags-links">'
    . esc_html__( 'Tagged %s', 'understrap' ) .
    '</span>', $tags_list );
// phpcs:ignore WordPress.Security.
EscapeOutput.OutputNotEscaped
}
}
if ( ! is_single() && ! post_password_required() &&
( comments_open() || get_comments_number() ) ) {
echo '<span class="comments-link">';
    comments_popup_link( esc_html__
            ( 'Leave a comment', 'understrap' ),
    esc_html__( '1 Comment', 'understrap' ),
    esc_html__( '% Comments', 'understrap' ) );
    echo '</span>';
}
edit_post_link(
sprintf(
/* translators: %s: Name of current post */
esc_html__( 'Edit %s', 'understrap' ),
the_title( '<span class="sr-only">"', '"</span>', false )
),
'<span class="edit-link">',
    '</span>'
);
}
}
子テーマの「function.php」にコピペして編集した内容:
//「カテゴリー:●●、コメントをどうぞ、を編集」の部分を変更
if ( ! function_exists( 'understrap_entry_footer' ) ) {
/**
* Prints HTML with meta information for the categories,
tags and comments.
*/
function understrap_entry_footer() {
// Hide category and tag text for pages.
if ( 'post' === get_post_type() ) {
/* translators: used between list items,
there is a space after the comma */
$categories_list =
get_the_category_list( esc_html__( ', ', 'understrap' ) );
if ( $categories_list && understrap_categorized_blog() ) {
/* translators: %s: Categories of current post */
printf( '<span class="cat-links">
    <i class="fa fa-folder"></i> '
    . esc_html__( '%s', 'understrap' ) . '</span>',
$categories_list );
// phpcs:ignore WordPress.Security.
EscapeOutput.OutputNotEscaped
}
/* translators: used between list items,
there is a space after the comma */
$tags_list =
get_the_tag_list( '', esc_html__
( ', ', 'understrap' ) );
if ( $tags_list ) {
/* translators: %s: Tags of current post */
printf( '<span class="tags-links">
    <i class="fa fa-tags"></i> '
    . esc_html__( '%s', 'understrap' ) .
    '</span>', $tags_list );
// phpcs:ignore WordPress.Security.
EscapeOutput.OutputNotEscaped
}
}

;
}
}
投稿一覧ページの本文末尾「[…]」削除と「続きを読む…」ボタンの変更
「/inc/setup.php」の該当部分を編集。
邪魔な文字列を削除して、ボタンのサイズを縮小、セカンダリーカラーの普通ボタンから基本色のアウトラインボタンに変更した。
参考:[wordpress] Understrap のカスタマイズ あれこれ
if ( ! function_exists( 'understrap_all_excerpts_get_more_link' ) ) {
/**
* Adds a custom read more link to all excerpts,
manually or automatically generated
*
* @param string $post_excerpt Posts's excerpt.
*
* @return string
*/
function understrap_all_excerpts_get_more_link( $post_excerpt ) {
if ( ! is_admin() ) {
$post_excerpt = $post_excerpt . '<p class="mt-4">
    <a class="btn btn-outline-primary
                          btn-sm understrap-read-more-link"
                           href="' .
                       esc_url( get_permalink( get_the_ID() ) ) . '">
                    ' . __(
        'Read More...',
        'understrap'
        ) . '</a></p>';
}
return $post_excerpt;
}
}
アイキャッチ画像に投稿ページをリンク&余白と幅の調整
Beansテーマではアイキャッチ画像をクリックすると投稿ページに移動することができたので、同様の機能を追加。
//投稿一覧ページのアイキャッチ画像に投稿をリンク
function myautolink_featured_image
     ( $html, $post_id, $post_image_id ) {
    if (! is_singular()) {
        $html = '<a href="' . get_permalink( $post_id ) . '
              " title="' . esc_attr( get_the_title( $post_id ) ) . '
              ">' . $html . '</a>';
        return $html;
    } else {
        return $html;
    }
}
add_filter( 'post_thumbnail_html',
               'myautolink_featured_image', 10, 3 );
また、アイキャッチ画像下部が詰まっていたので余白を追加し、画像が小さいときに幅が100%に拡大されるようCSSに追記。
.wp-post-image{margin-bottom: 1rem; width: 100%;}見出しタグ(H1~H6)の大きさ変更
文字が大きすぎるのでstyle.cssを使って 2.5rem、1.5rem 、 1.25rem …にちょっと縮小。長いのでコードは割愛。
ナビゲーションバーの色変更と余白の調整
「header.php」の <nav> タグのクラスに「bg-nav」を設定し、後からstyle.cssで独自に色を変更できるようにした。
<!-- ******************* The Navbar Area ******************* -->
<div id="wrapper-navbar">

     <a class="skip-link sr-only sr-only-focusable" href="#content">
         <?php esc_html_e( 'Skip to content', 'understrap' ); ?></a>

     <nav id="main-nav"
           class="navbar navbar-expand-md navbar-dark bg-nav"
           aria-labelledby="main-nav-label">

     <h2 id="main-nav-label" class="sr-only">
        <?php esc_html_e( 'Main Navigation', 'understrap' ); ?>
     </h2>
     ......
「bg-nav」の内容は以下のとおり。
.bg-nav {
    background-color: #333;
}
また、ナビゲーションバー内外の余白も追加した。
.navbar{
    padding-top:0.8rem; padding-bottom: 0.8rem;margin-bottom: 2rem;
}
記事タイトルとメタ情報の色変更&調整
個別記事タイトル、投稿日、カテゴリーのリンクが <a> タグの書式だったところを変更。ついでにフォントサイズと余白も調整した。
.entry-title{font-size:1.5rem;
font-weight: bold; margin: 1rem 0 0.5rem;}
h2.entry-title a{ color: #333;}
h2.entry-title a:hover{ color: #666;}

.entry-meta{font-size: 0.8em; color: #555; margin-bottom: 1.5rem;}
div.entry-meta a{color: #333;}
div.entry-meta a:hover{color: #666;}

.entry-footer{font-size: 0.8em; color: #555; margin-bottom: 1.5rem;}
footer.entry-footer a{ color: #333;}
footer.entry-footer a:hover{ color: #666;}
記事一覧ページに境界線挿入
記事同士の余白を広げてグレーの境界線を挿入。
/* 記事一覧ページの記事同士の余白 + 記事同士の境界線 */
body:not(.single) article:nth-child(n+2) {
    margin-top: 3rem;
    border-top: .2rem solid lightgray;
    padding-top: 1rem;
}
すべての固定ページのタイトルと「編集」リンクを非表示に
/* 全固定ページのタイトルと「編集」リンクを非表示 */
.page .entry-title {
    display: none;
}
.edit-link {
    display: none;
}
現段階で改造できたのはこのあたりまで。壁紙はダッシュボードのカスタマイズで変更してる。

あとは、記事背景色を白くしたりしたり、ヘッダーをもう少し見栄え良くしてみたり、固定ページを編集し直したり、できればアイキャッチ画像の代わりに投稿記事最初の画像をサムネとして表示させたり、カテゴリー内でのページ送りに変更したり…いろいろ残ってるな。
将来的にはドロワーも実装できたらいいなあ。重くなりそうだけど。
続く。
